Category: How-to

Common requests answered

  • How to rename the ‘admin’ folder in PHP Melody

    Starting with PHP Melody v2.2 you can easily move/rename PHP Melody’s ‘admin‘ folder.

    You may want to do this for several reasons all concerning the security of your website. Let’s see how you can rename the ‘admin‘ folder without breaking PHP Melody.

    Step 1.

    Open /config.php and find this line:

    define('_ADMIN_FOLDER', 'admin');

    Replace the ‘admin‘ value with your new folder name (e.g. admin2015). Edit only the underlined bit. Make sure there are no empty spaces between the single quotes.

    Save and upload /config.php to your installation.

    Step 2.

    Rename your ‘admin‘ folder to match the new folder name (i.e. admin2015).

    That’s it. Job done!

  • How to create ad zones in Mobile Melody v2.x

    As you know, PHP Melody comes with pre-made ad zones for the ‘Classic banners’.

    However, if you want to add ads to your Mobile Melody layout, you need to create new ad zones. This is because, unfortunately most banners do not come with responsive support. Having separate ad zones for Mobile Melody will also enable you to easily track you mobile traffic revenue separately form your regular (desktop) site.

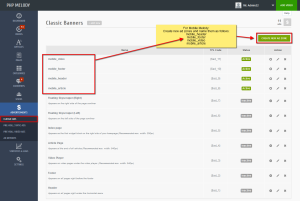
    To add your first ads on Mobile Melody, you need to log into the PHP Melody back-end and go to “Advertisements > Classic Banners” page. Click the “Create new ad zone” and in the “name” field (the first form field) use any of these names:

    • mobile_header
    • mobile_footer
    • mobile_video
    • mobile_article

    Mobile Melody will recognize and display these ads them as follows:

    • mobile_header: appears in the header
    • mobile_footer: appears in the footer
    • mobile_video: appears after the video player
    • mobile_article: appears after the article

    Here is a screenshot to get you started, but if you have any questions please contact the support team.

    How to add Mobile Melody ads

  • How to use the ‘Custom Fields’

    Starting with v2.0 (April 25th, 2013), PHP Melody has the ability to assign custom fields to each video, article or page. This extra data is also known as meta data and it can include data such as:

    • Artist: Michael Jackson
    • Speaker: Thomas K.
    • Episode: #7
    • Season: #2
    • Video Part: #1

    These are merely a few examples of the possible uses for ‘custom fields’ or, as otherwise known: meta data. Custom fields are user defined, meaning you can define any meta data relevant to the video, article or page posted.

    Custom fields come in name/value pairs. The name is the identifier while the value is the actual information you wish to display on the page. In the first example, “Artist” is the name while “Michael Jackson” is the value.

    Custom Fields Usage

    Assuming we have a music video website, we’re going to add a new ‘custom field’ named artist. The following steps need to be taken to add the new ‘custom field’:

    1. After you’ve added/edited your video scroll to the bottom of the page to the area titled Custom Fields.
    2. In the first text field, titled ‘Custom name’, enter artist and in the second text field, titled ‘Custom value’, enter “Michael Jackson” or the artist associated with the video.
    3. Click the Add Custom Field button to assign this ‘custom field’ to the video before saving.

    Custom Fields

    The next time you post a video you can select the alredy created artist field by clicking the ‘Select Existing Field’ link within the Custom Fields form.

    You can add as many custom fields as your site requires.

    Displaying Custom Fields

    Once defined, you will have to output the value for this new ‘custom field’ on the actual page your visitors will see. This can be done by inserting some additional code into your theme. In our case, we will add the artist filed in the title of the page after the video name.
    For this, we need to edit the /templates/default/video-watch.tpl file:

    —————[ FIND ]—————

    <h1>{$video_data.video_title}</h1>

    —————[ REPLACE WITH ]—————

    <h1>{$video_data.video_title} {get_video_meta video_id=$video_data.id key='artist'}</h1>

    As underlined in the replacement code, the KEY was set to the ‘Custom Name’. In our case it was artist, as previously defined in the Admin Area (video editing/adding form).

    If we define another custom field, named season, we will use:

    {get_video_meta video_id=$video_data.id key='season'}

    This code can be placed anywhere in the video-watch.tpl file and even styled with some CSS afterwards.

    Note: this example was for a video page. To use the custom fields on an article page (i.e. article-read.tpl), the code would be:

    {get_video_meta video_id=$article.id key='season'}

    Additional usage

    If you have more than one custom field, you can list them all in an ordered list (<ul>) by using this following code in video-watch.tpl:

    {get_video_meta_list video_id=$video_data.id}

    or in article-read.tpl:

    {get_article_meta_list article_id=$article.id}
  • How to create a new MySQL user and database (video)

    As you’ve probably learned, each new PHP Melody installation requires a MySQL database and a MySQL user for that database. In the following article we’ll show you how to create your MySQL user and database. The example was created using cPanel. If you’re using Plesk or Godaddy, the video might not make match sense.

    In broad terms, here are the steps you need to follow:

    Step 1: Log into your hosting control panel (cPanel, Plesk, etc.)

    Step 2: Go to your MySQL database manager

    Step 3: Create a new MySQL database

    Step 4: Create a new MySQL user

    Step 5: Add the new user to the new database by granting “All Privileges”.

    The video might be a bit too fast to follow. Feel free to use the pause button.

  • How to change the default PHP Melody favicon

    How to change the default PHP Melody favicon

    The default PHP Melody favicon is stored in the /templates/[current theme]/img/ folder (e.g. https://demo.phpmelody.com/templates/default/img/favicon.ico).

    If you don’t have a favicon file for your site yet, you can create one from your logo by visiting our favorite online favicon generator.

    Once you’re satisfied with the results, save your freshly generated favicon.ico file to your computer. Then, upload it to your PHP Melody installation, replacing the existing file from your  /templates/[current theme]/img/ folder.

    Job well done.

    Note: Starting with PHP Melody v2.3 the favicon.ico file was moved to the /templates/[current theme]/img/ folder. Older PHP Melody versions store favicon.ico in the /uploads/ folder.